Electrical Panel Schedule PDF Form
Electrical Panel Schedule PDF Form
Failing to accurately identify the panel name. Each panel should have a unique name that reflects its location or function.
Omitting the load calculations. It is essential to calculate the total load to ensure the panel can handle the electrical demand.
Not specifying the circuit numbers. Each circuit should be clearly numbered to avoid confusion during installation and maintenance.
Using incorrect breaker sizes. Selecting the wrong size can lead to safety hazards or equipment damage.
Neglecting to indicate the type of load on each circuit. This information helps in understanding the purpose of each circuit.
Leaving out future expansion plans. Including potential future loads can aid in planning for upgrades or changes.
Failing to review for accuracy and completeness before submission. Double-checking the form can prevent costly errors.
Not consulting with a qualified electrician. Expert input can help ensure that the form is filled out correctly and meets all safety standards.
The Electrical Panel Schedule form is an important document used in electrical installations and maintenance. It shares similarities with several other documents in the electrical and construction fields. Below are four documents that are similar to the Electrical Panel Schedule form, along with explanations of their similarities:
Durable Power of Attorney Form: This form is critical for individuals looking to appoint someone to manage their financial and legal affairs, particularly if they become incapacitated. It ensures that their interests are safeguarded and can be found at azformsonline.com/durable-power-of-attorney/.
When filling out the Electrical Panel Schedule form, it is important to follow certain guidelines to ensure accuracy and compliance. Below are six recommendations that highlight what to do and what to avoid.
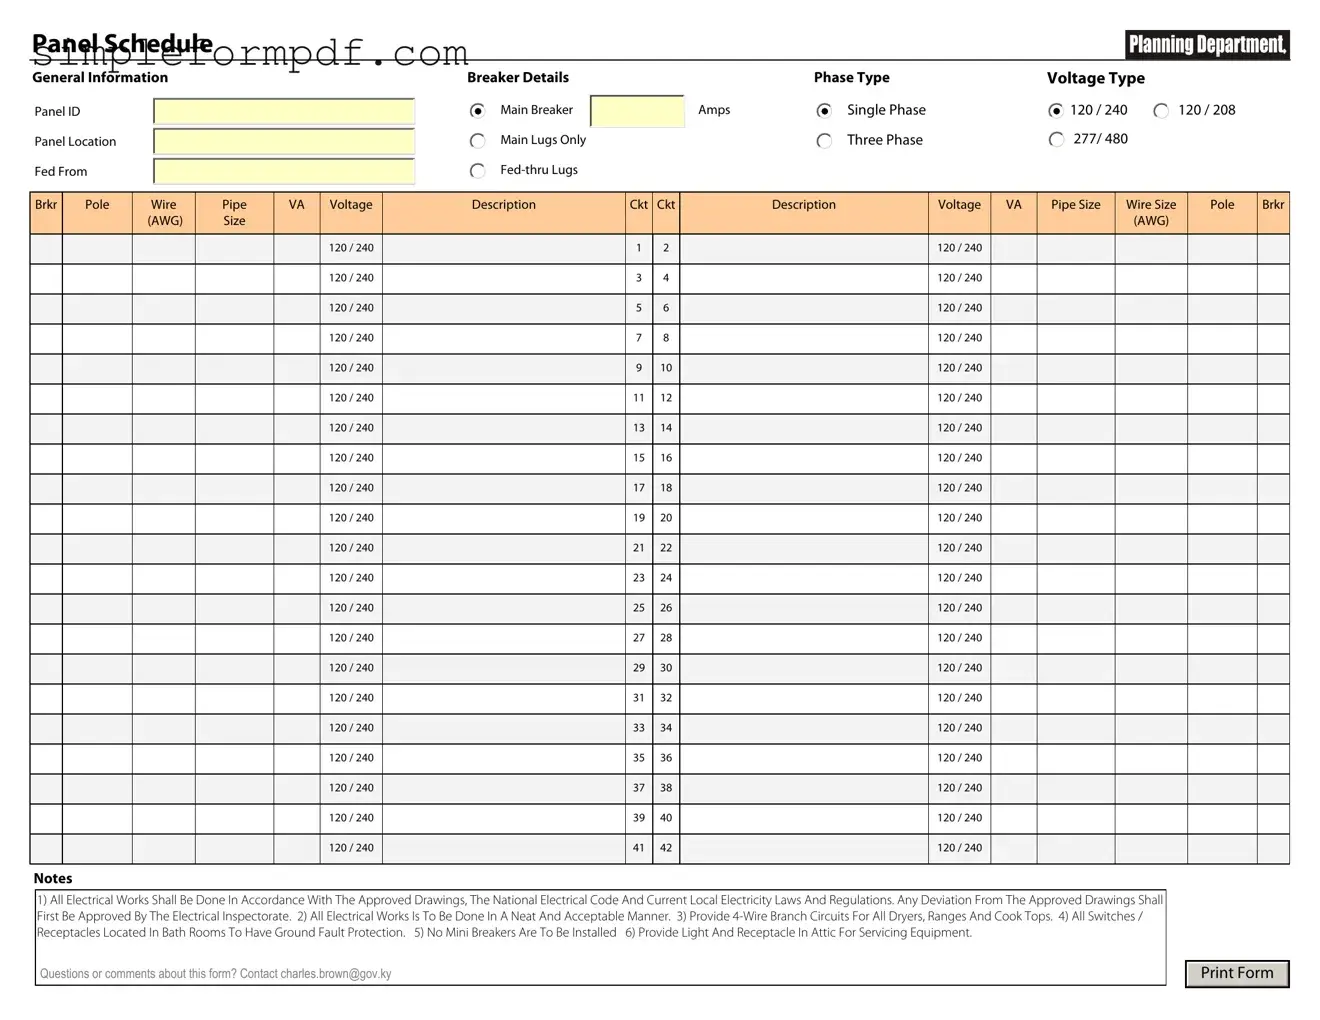
Panel Schedule
General Information
Panel ID
Panel Location
Fed From
Breaker Details
Main Breaker
Main Lugs Only
|
Phase Type |
Voltage Type |
|
Amps |
Single Phase |
120 / 240 |
120 / 208 |
|
Three Phase |
277/ 480 |
120 / 240 |
|
|
|
Brkr |
Pole |
Wire |
Pipe |
VA |
Voltage |
Description |
Ckt |
Ckt |
Description |
Voltage |
VA |
Pipe Size |
Wire Size |
Pole |
Brkr |
|
|
(AWG) |
Size |
|
|
|
|
|
|
|
|
|
(AWG) |
|
|
|
|
|
|
|
|
|
|
|
|
|
|
|
|
|
|
|
|
|
|
|
120 / 240 |
|
1 |
2 |
|
120 / 240 |
|
|
|
|
|
|
|
|
|
|
|
|
|
|
|
|
|
|
|
|
|
|
|
|
|
|
120 / 240 |
|
3 |
4 |
|
120 / 240 |
|
|
|
|
|
|
|
|
|
|
|
|
|
|
|
|
|
|
|
|
|
|
|
|
|
|
120 / 240 |
|
5 |
6 |
|
120 / 240 |
|
|
|
|
|
|
|
|
|
|
|
|
|
|
|
|
|
|
|
|
|
|
|
|
|
|
120 / 240 |
|
7 |
8 |
|
120 / 240 |
|
|
|
|
|
|
|
|
|
|
|
|
|
|
|
|
|
|
|
|
|
|
|
|
|
|
120 / 240 |
|
9 |
10 |
|
120 / 240 |
|
|
|
|
|
|
|
|
|
|
|
|
|
|
|
|
|
|
|
|
|
|
|
|
|
|
120 / 240 |
|
11 |
12 |
|
120 / 240 |
|
|
|
|
|
|
|
|
|
|
|
|
|
|
|
|
|
|
|
|
|
|
|
|
|
|
120 / 240 |
|
13 |
14 |
|
120 / 240 |
|
|
|
|
|
|
|
|
|
|
|
|
|
|
|
|
|
|
|
|
|
|
|
|
|
|
120 / 240 |
|
15 |
16 |
|
120 / 240 |
|
|
|
|
|
|
|
|
|
|
|
|
|
|
|
|
|
|
|
|
|
|
|
|
|
|
120 / 240 |
|
17 |
18 |
|
120 / 240 |
|
|
|
|
|
|
|
|
|
|
|
|
|
|
|
|
|
|
|
|
|
|
|
|
|
|
120 / 240 |
|
19 |
20 |
|
120 / 240 |
|
|
|
|
|
|
|
|
|
|
|
|
|
|
|
|
|
|
|
|
|
|
|
|
|
|
120 / 240 |
|
21 |
22 |
|
120 / 240 |
|
|
|
|
|
|
|
|
|
|
|
|
|
|
|
|
|
|
|
|
|
|
|
|
|
|
120 / 240 |
|
23 |
24 |
|
120 / 240 |
|
|
|
|
|
|
|
|
|
|
|
|
|
|
|
|
|
|
|
|
|
|
|
|
|
|
120 / 240 |
|
25 |
26 |
|
120 / 240 |
|
|
|
|
|
|
|
|
|
|
|
|
|
|
|
|
|
|
|
|
|
|
|
|
|
|
120 / 240 |
|
27 |
28 |
|
120 / 240 |
|
|
|
|
|
|
|
|
|
|
|
|
|
|
|
|
|
|
|
|
|
|
|
|
|
|
120 / 240 |
|
29 |
30 |
|
120 / 240 |
|
|
|
|
|
|
|
|
|
|
|
|
|
|
|
|
|
|
|
|
|
|
|
|
|
|
120 / 240 |
|
31 |
32 |
|
120 / 240 |
|
|
|
|
|
|
|
|
|
|
|
|
|
|
|
|
|
|
|
|
|
|
|
|
|
|
120 / 240 |
|
33 |
34 |
|
120 / 240 |
|
|
|
|
|
|
|
|
|
|
|
|
|
|
|
|
|
|
|
|
|
|
|
|
|
|
120 / 240 |
|
35 |
36 |
|
120 / 240 |
|
|
|
|
|
|
|
|
|
|
|
|
|
|
|
|
|
|
|
|
|
|
|
|
|
|
120 / 240 |
|
37 |
38 |
|
120 / 240 |
|
|
|
|
|
|
|
|
|
|
|
|
|
|
|
|
|
|
|
|
|
|
|
|
|
|
120 / 240 |
|
39 |
40 |
|
120 / 240 |
|
|
|
|
|
|
|
|
|
|
|
|
|
|
|
|
|
|
|
|
|
|
|
|
|
|
120 / 240 |
|
41 |
42 |
|
120 / 240 |
|
|
|
|
|
|
|
|
|
|
|
|
|
|
|
|
|
|
|
|
|
Notes
1)All Electrical Works Shall Be Done In Accordance With The Approved Drawings, The National Electrical Code And Current Local Electricity Laws And Regulations. Any Deviation From The Approved Drawings Shall First Be Approved By The Electrical Inspectorate. 2) All Electrical Works Is To Be Done In A Neat And Acceptable Manner. 3) Provide
Receptacles Located In Bath Rooms To Have Ground Fault Protection. 5) No Mini Breakers Are To Be Installed 6) Provide Light And Receptacle In Attic For Servicing Equipment.
Questions or comments about this form? Contact charles.brown@gov.ky
Print Form
State Disability California - Filing this form initiates the process for receiving disability benefits.
To ensure that your proprietary information remains protected, it is essential to utilize a formal contract, such as a Non-disclosure Agreement (NDA) provided by Missouri PDF Forms, which creates a framework for confidentiality between parties and helps in mitigating potential risks associated with information sharing.
Miscellaneous Information - Taxpayers may need additional documentation to substantiate income reported on the 1099-MISC in the event of an audit.
Understanding the Electrical Panel Schedule form is crucial for both homeowners and professionals. However, several misconceptions can lead to confusion. Here are five common misunderstandings:
By addressing these misconceptions, individuals can better appreciate the importance of the Electrical Panel Schedule form and its role in maintaining electrical safety and efficiency.
Completing the Electrical Panel Schedule form is essential for ensuring accurate documentation of electrical systems. Follow these steps carefully to ensure all necessary information is captured correctly.